Secure token management for Amazon InfluxDB
Glenn Gillen
VP of Product, GTM
If you're running InfluxDB (including the the managed Amazon Timestream for InfluxDB service) there's two large challenges that many production deployments will encounter:
- How do you mitigate the risks of issuing tokens to your InfluxDB clients?
- How do you securely connect clients when they're not in the same network as the InfluxDB database?
When you've got hundreds or thousands of distributed clients using the same set of shared long-lived and overly permissive access credentials the last thing you need is a publicly accessible database. If any of those thousands of clients is compromised your system is entirely vulnerable. But secure credential distribution and scaling secure connectivity are both hard distributed systems problems!
Don't fear, I'm going to show you an easy to setup solution that solves both of these problems for you at the same time! By the end of this guide you'll have:
- The ability to connect InfluxDB clients to your private Amazon Timestream for InfluxDB service, no matter where they're running — without the need to make InfluxDB accessible from the public internet, no setting up port forwarding or IP rules.
- Automated, secure token management for InfluxDB that grants least-privilege unique access credentials to each client — no more sharing long-lived tokens among multiple clients
- Automatic time-based revocation, renewal, and rotation of client tokens.
Introducing the Amazon InfluxDB Token Management with Ockam!
Prerequisites
Before getting started, ensure you have:
- An AWS account with appropriate permissions
- Docker and Docker Compose installed
- AWS CLI configured
- Basic familiarity with AWS services (VPC, EC2, CloudFormation)
- Approximately 45 minutes of time for complete setup (less if you have Timestream for InfluxDB already provisioned)
Amazon Timestream InfluxDB 💙 Ockam
Amazon Timestream for InfluxDB offers a managed time-series database engine that empowers application developers and DevOps teams to run InfluxDB databases on AWS. It supports real-time time-series applications using open-source APIs and delivers single-digit millisecond query response times.
The challenge of managing access at scale
Managing credentials for thousands of discrete clients challenges organizations at scale. The operational burden of issuing unique credentials often leads companies to share a single credential across their client services and devices. This approach increases risk - any compromised client could expose secrets used by the entire fleet. When credentials leak, organizations must scramble to revoke and deploy new credentials across their entire infrastructure simultaneously. Industry best practices recommend regular credential auditing and rotation to reduce business risk. However, this continuous revocation and rotation creates ongoing operational complexity that grows with the client base.
Securing your InfluxDB instance
Ockam with Amazon Timestream for InfluxDB lets you keep your InfluxDB instance private. Using Ockam's secure channels, you can restrict access to authenticated and authorized Ockam nodes only. This provides:
- Reduced Attack Surface: Keeping your InfluxDB instance off the public internet significantly limits potential attack vectors.
- Enhanced Security: Ockam's secure channels encrypt data in transit and restrict access to authorized clients only.
- Simplified Network Configuration: You eliminate the need for complex firewall rules or VPNs.
Ockam's Automated token management solution works with any InfluxDB client out of the box. Organizations can define standardized policies for uniquely identifiable, least privilege, time-limited credentials. Each client requests its own credential and uses it wherever InfluxDB credentials apply. The time-limited design automatically revokes expired credentials, prompting clients to request new ones to maintain communication.
This post shows you how to set up automated, secure token management for Amazon Timestream InfluxDB using Ockam in four steps:
- Step 1: Create a private Amazon Timestream InfluxDB instance (15 minutes)
- Step 2: Sign up for Ockam and create enrollment tickets (5 minutes)
- Step 3: Set up an Ockam outlet node with the lease manager alongside your private InfluxDB instance (15 minutes)
- Step 4: Set up an Ockam inlet node on your client device to request credentials and communicate with InfluxDB (10 minutes)
Step 1: Create a private Amazon Timestream InfluxDB instance
Let's create a private Amazon Timestream InfluxDB instance to demonstrate an end-to-end example of automated, secure token management using telegraf to send data to the database. If you already have a private InfluxDB instance, you can skip this section.
Create InfluxDB instance using CloudFormation template
For ease of use, we have prepared a CloudFormation template that deploys all the required infrastructure for you. This template simplifies the setup process by automating the creation of resources.
Open our Timestream for InfluxDB stack
in a new tab, ensuring you launch it in the us-east-1 region, and then follow
the instructions.
The CloudFormation template will create:
- An InfluxDB instance on the provided VPC and subnets
- A security group for InfluxDB that allows inbound traffic from the VPC CIDR block.
- An EC2 instance in one of the subnets with the InfluxDB client downloaded to use in
/optdirectory.
Create InfluxDB instance manually
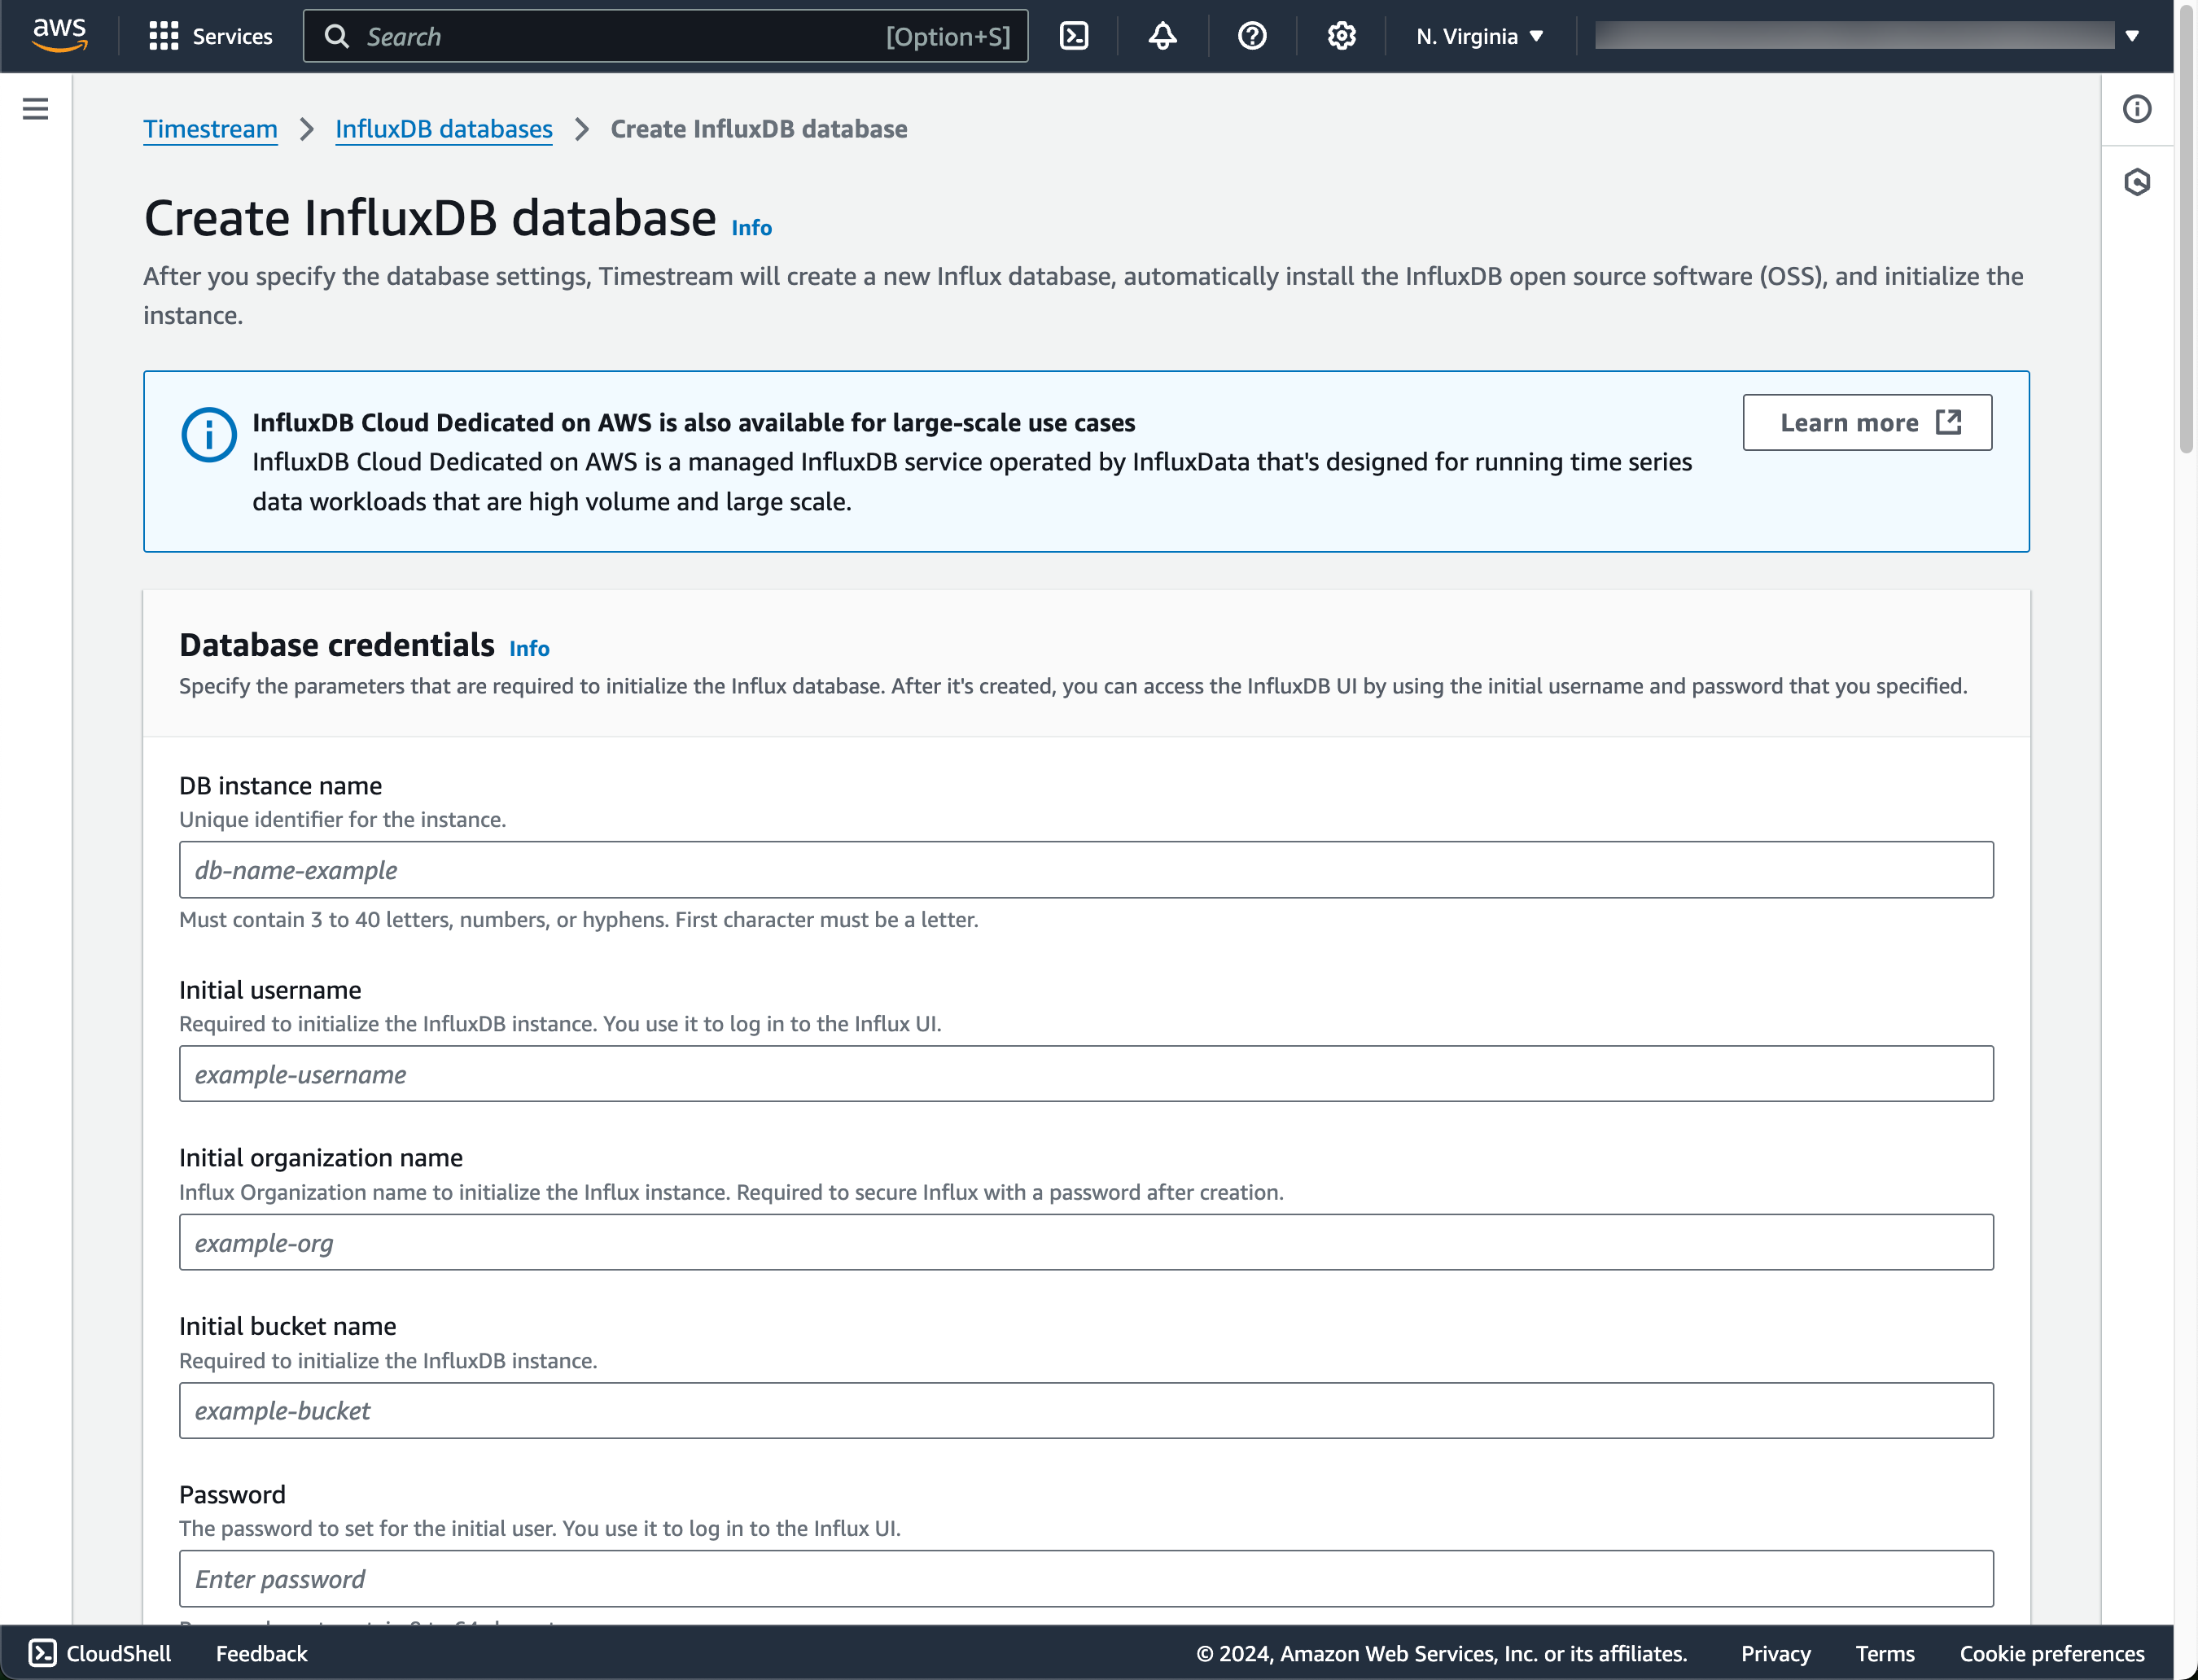
Deploy manually via AWS Console
- Navigate to the AWS Console
- Search for
influxdbin the search field at the top - Select the matching result and visit the InfluxDB databases screen
- Click
Create InfluxDB Database
Configure the following settings:
- Database credentials: Enter the required details
- Instance configuration/Storage configuration/Availability settings: Update as needed
- Connectivity configuration: Choose a VPC, choose (private) subnets.
- Choose a security group
- Inbound rules: Custom TCP rule for port 8086 and source IP address range of your VPC or limit it to a subnet that will be used by the Ockam node
- Outbound rules: All traffic to
0.0.0.0/0
- Publicly accessible: Select "Not publicly accessible"
- Database port: Leave the default value of
8086
- Choose a security group
- Parameter group: Leave the default value
- Tags: Add any tags you want to help with billing and resource management
Click Create InfluxDB Database
Note: Database creation takes approximately 15 minutes to complete.
Create an All Access InfluxDB Token and Obtain Org ID
If you used the Cloudformation template to create your InfluxDB instance, you
will also have an ec2 machine <STACK_NAME>-ec2-instance created that has the
Influx CLI pre-installed so you can run the below. Connect to the machine using
Session Manager and run sudo su to switch to the root user.
Note: As part of InfluxDB creation, a secret will be created in AWS Secrets
Manager (READONLY-InfluxDB-auth-parameters-<DBIDENTIFIER>). This secret will
contain the bucket, password, organization name and username.
Step 2: Sign up for Ockam and create enrollment tickets
Enrollment tickets provision Ockam nodes. We'll create two enrollment tickets:
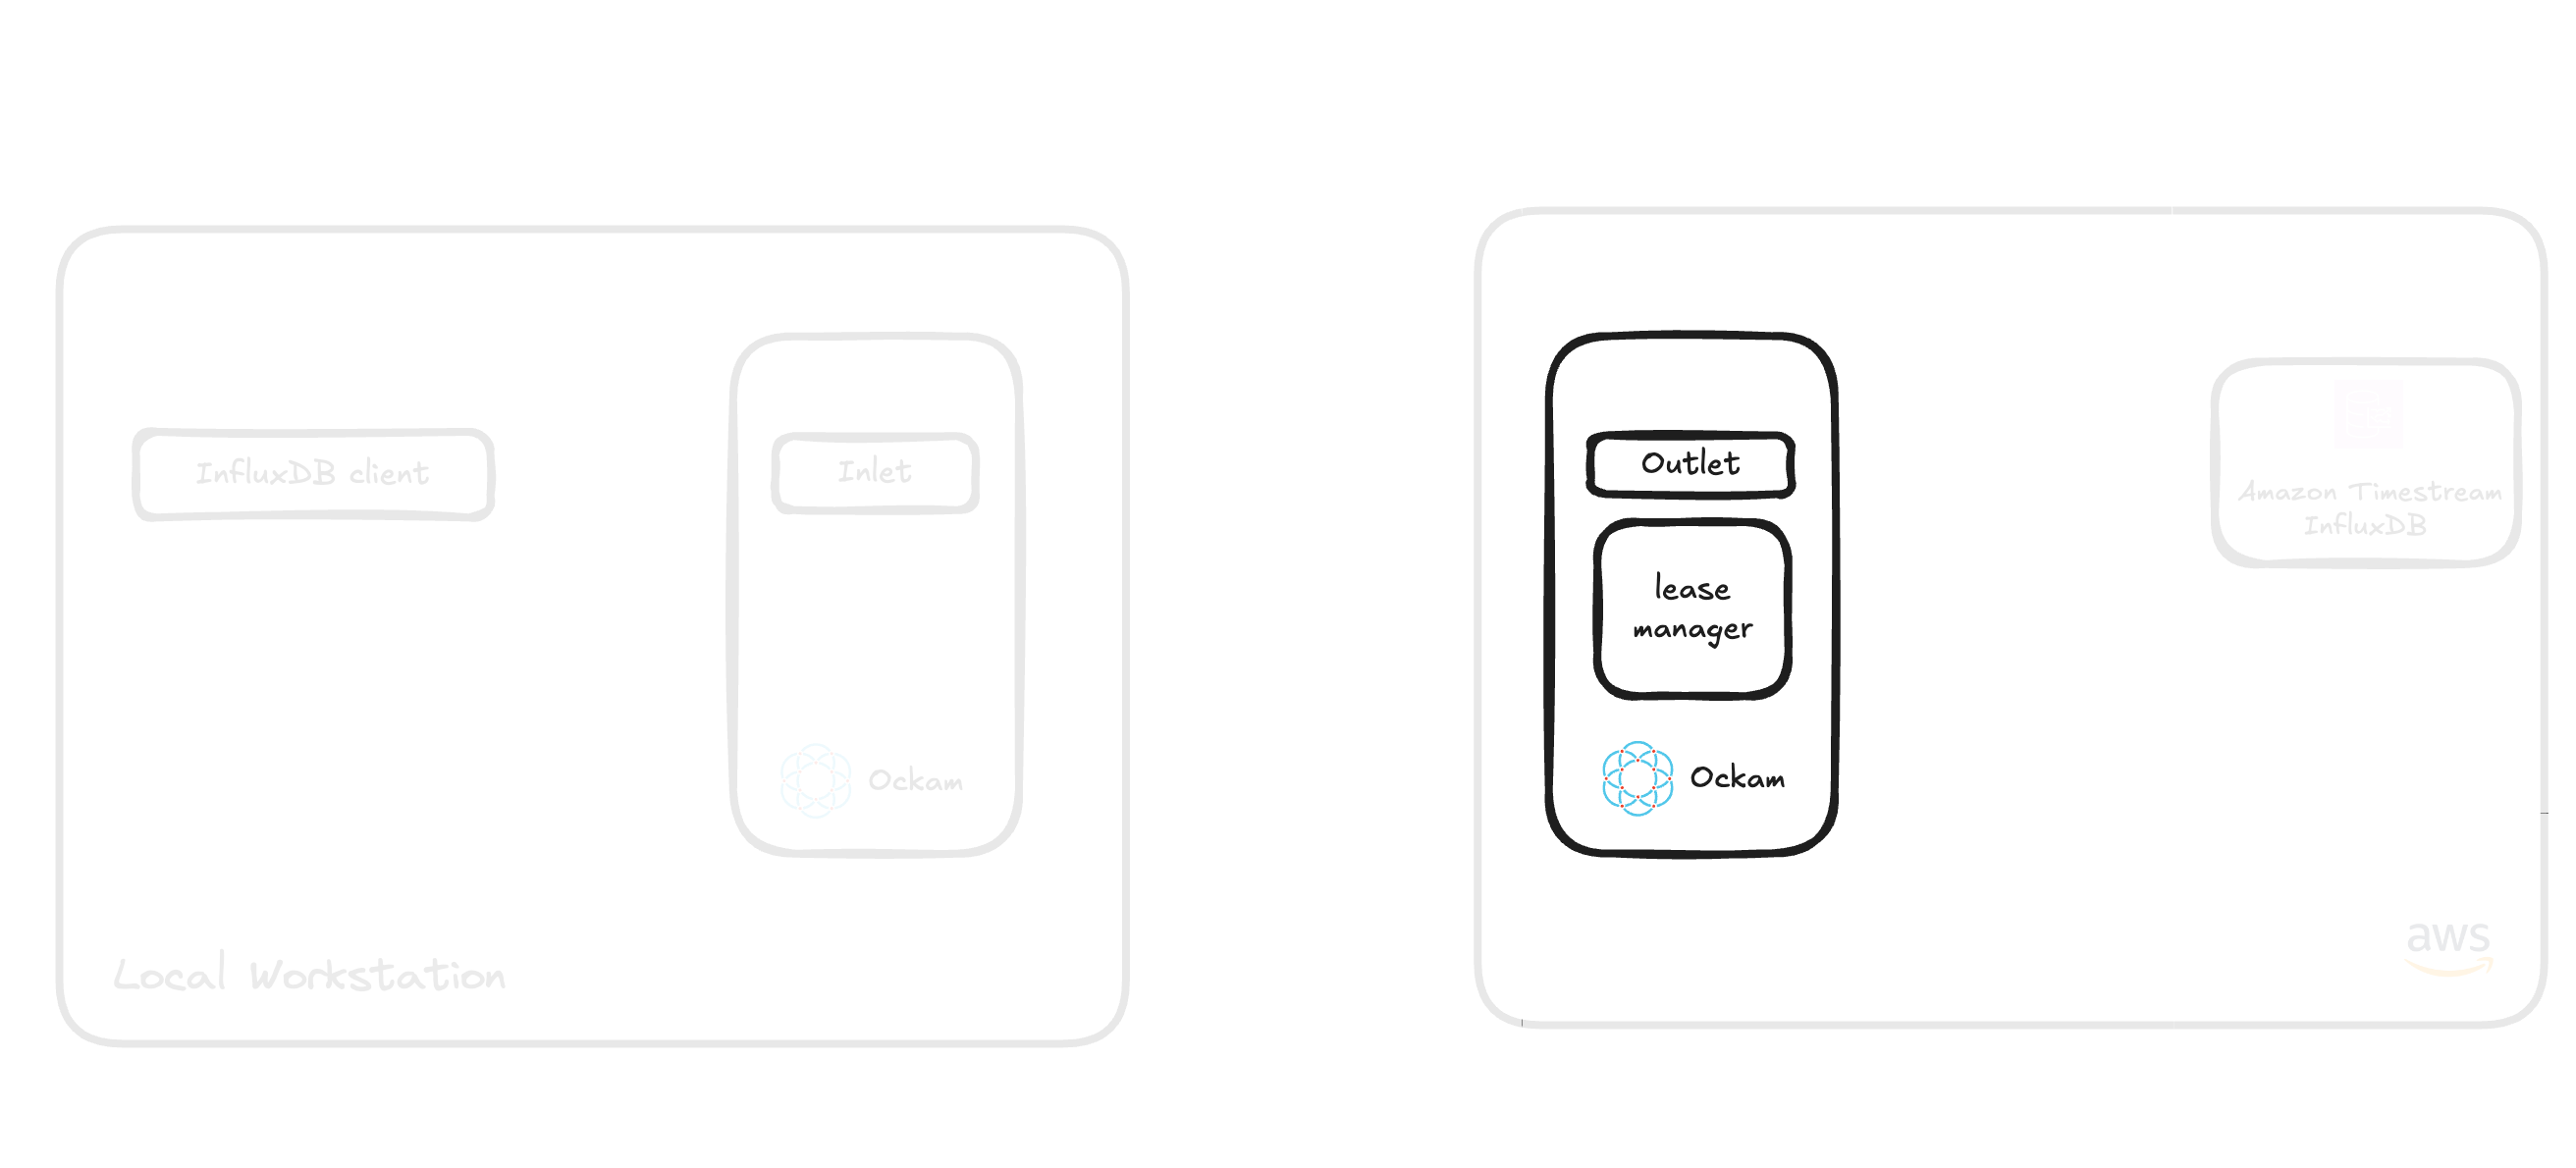
- One for the Ockam Outlet node that runs alongside the private InfluxDB instance containing the lease manager.
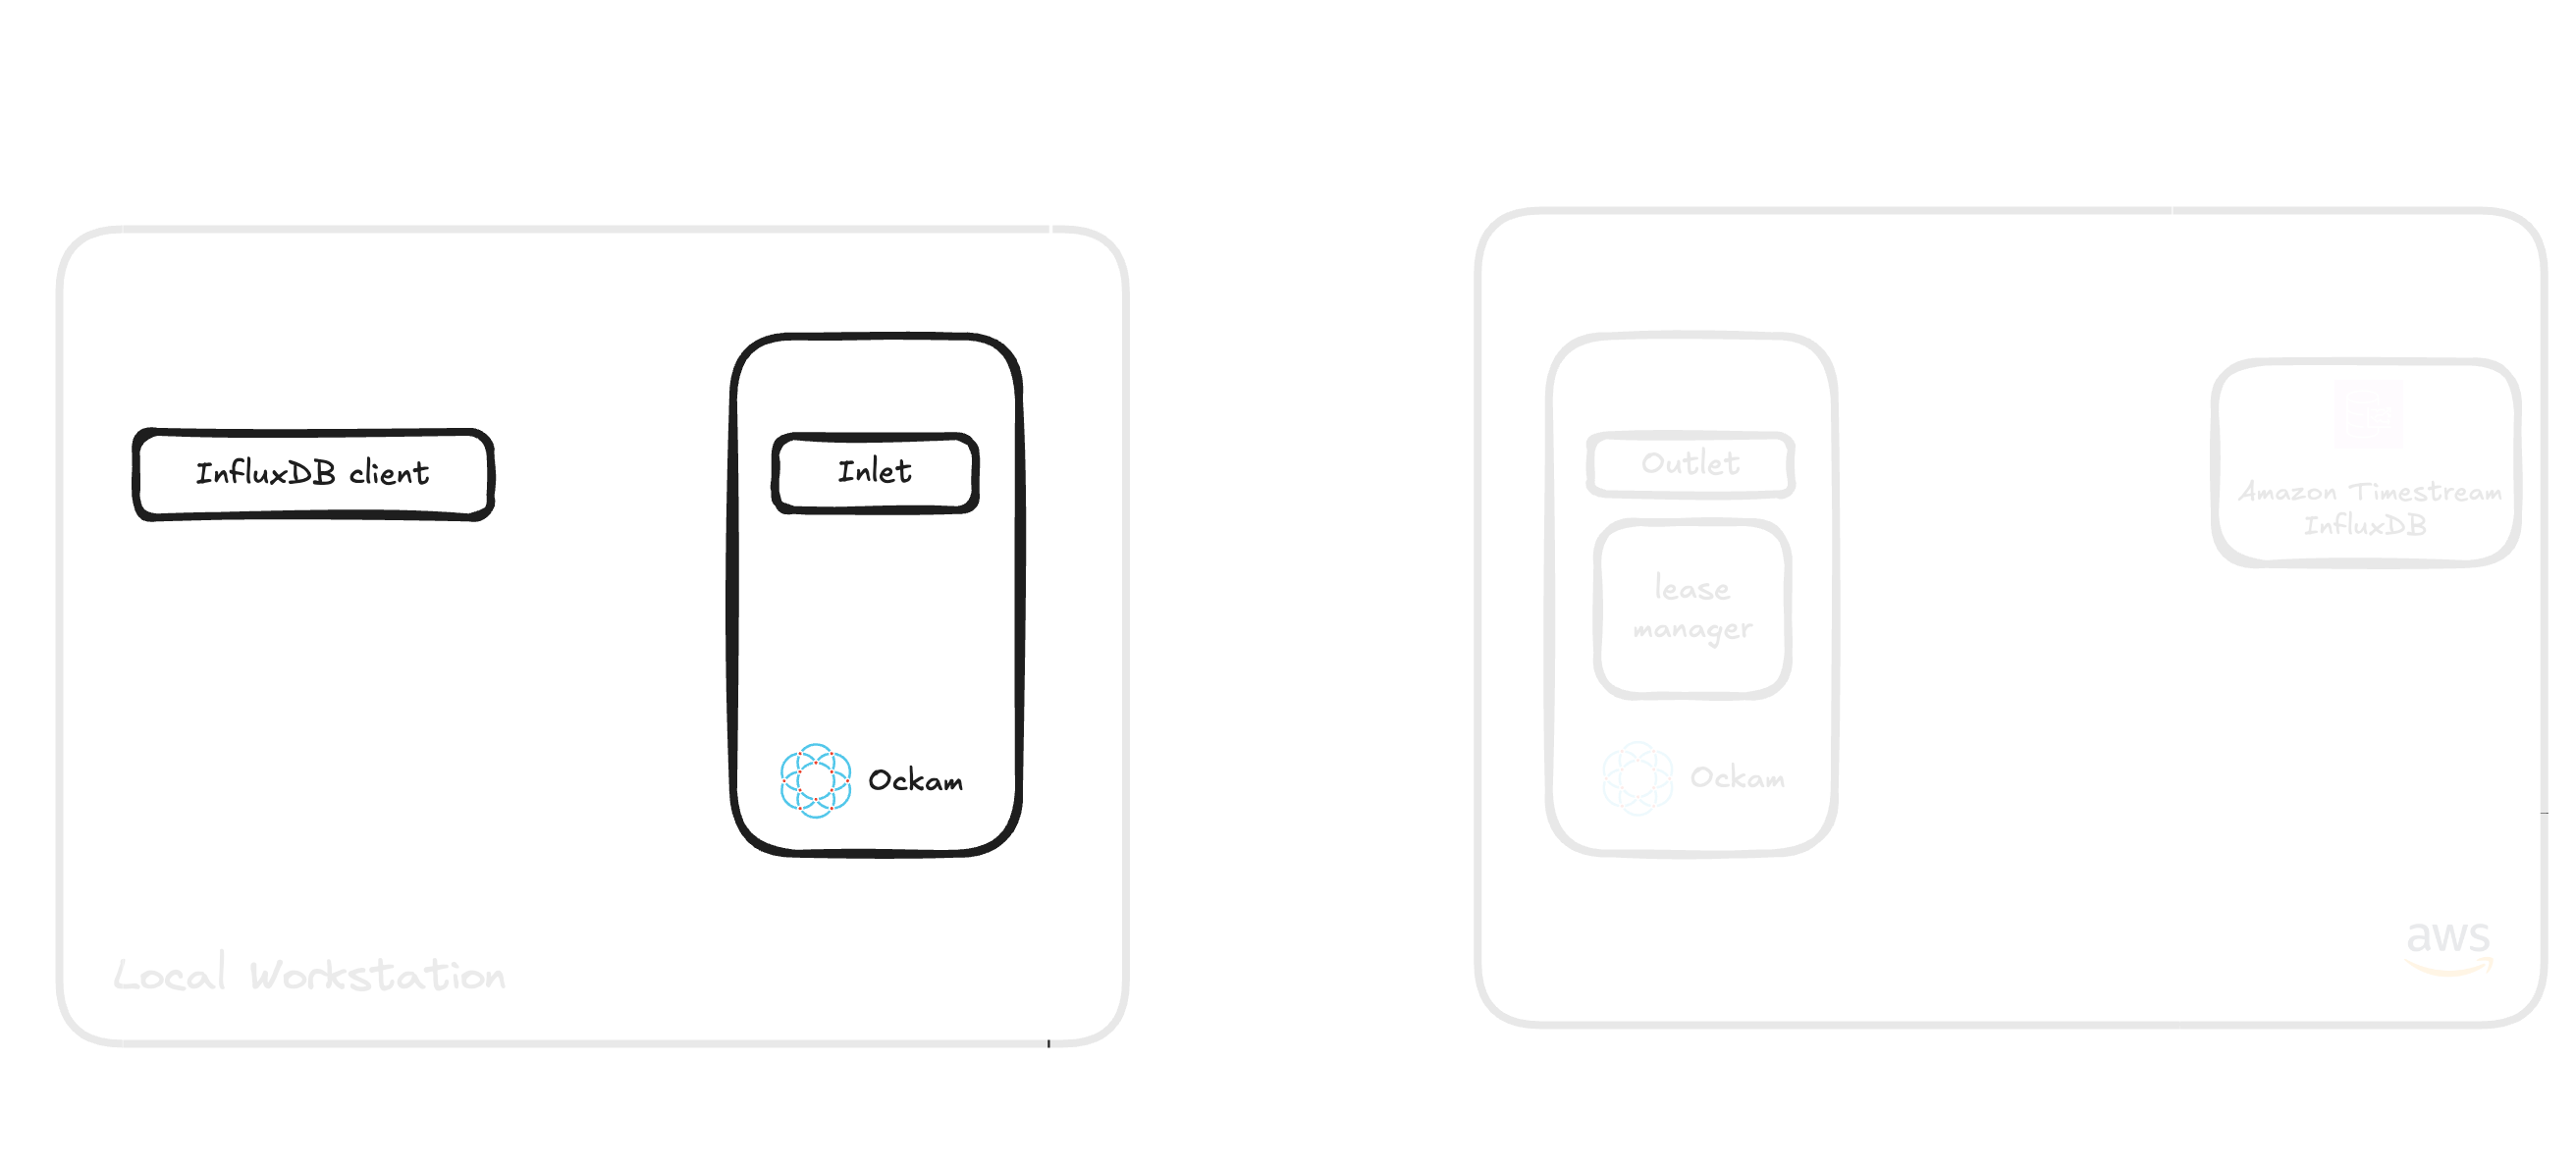
- One for the Ockam Inlet node that runs on your client devices to communicate with the Ockam Outlet node.
Step 3: Deploy the Ockam Outlet Node
The Ockam Node for Amazon Timestream InfluxDB streamlines deploying a managed Ockam Node in your AWS VPC.
Launch Ockam node for Amazon Timestream InfluxDB
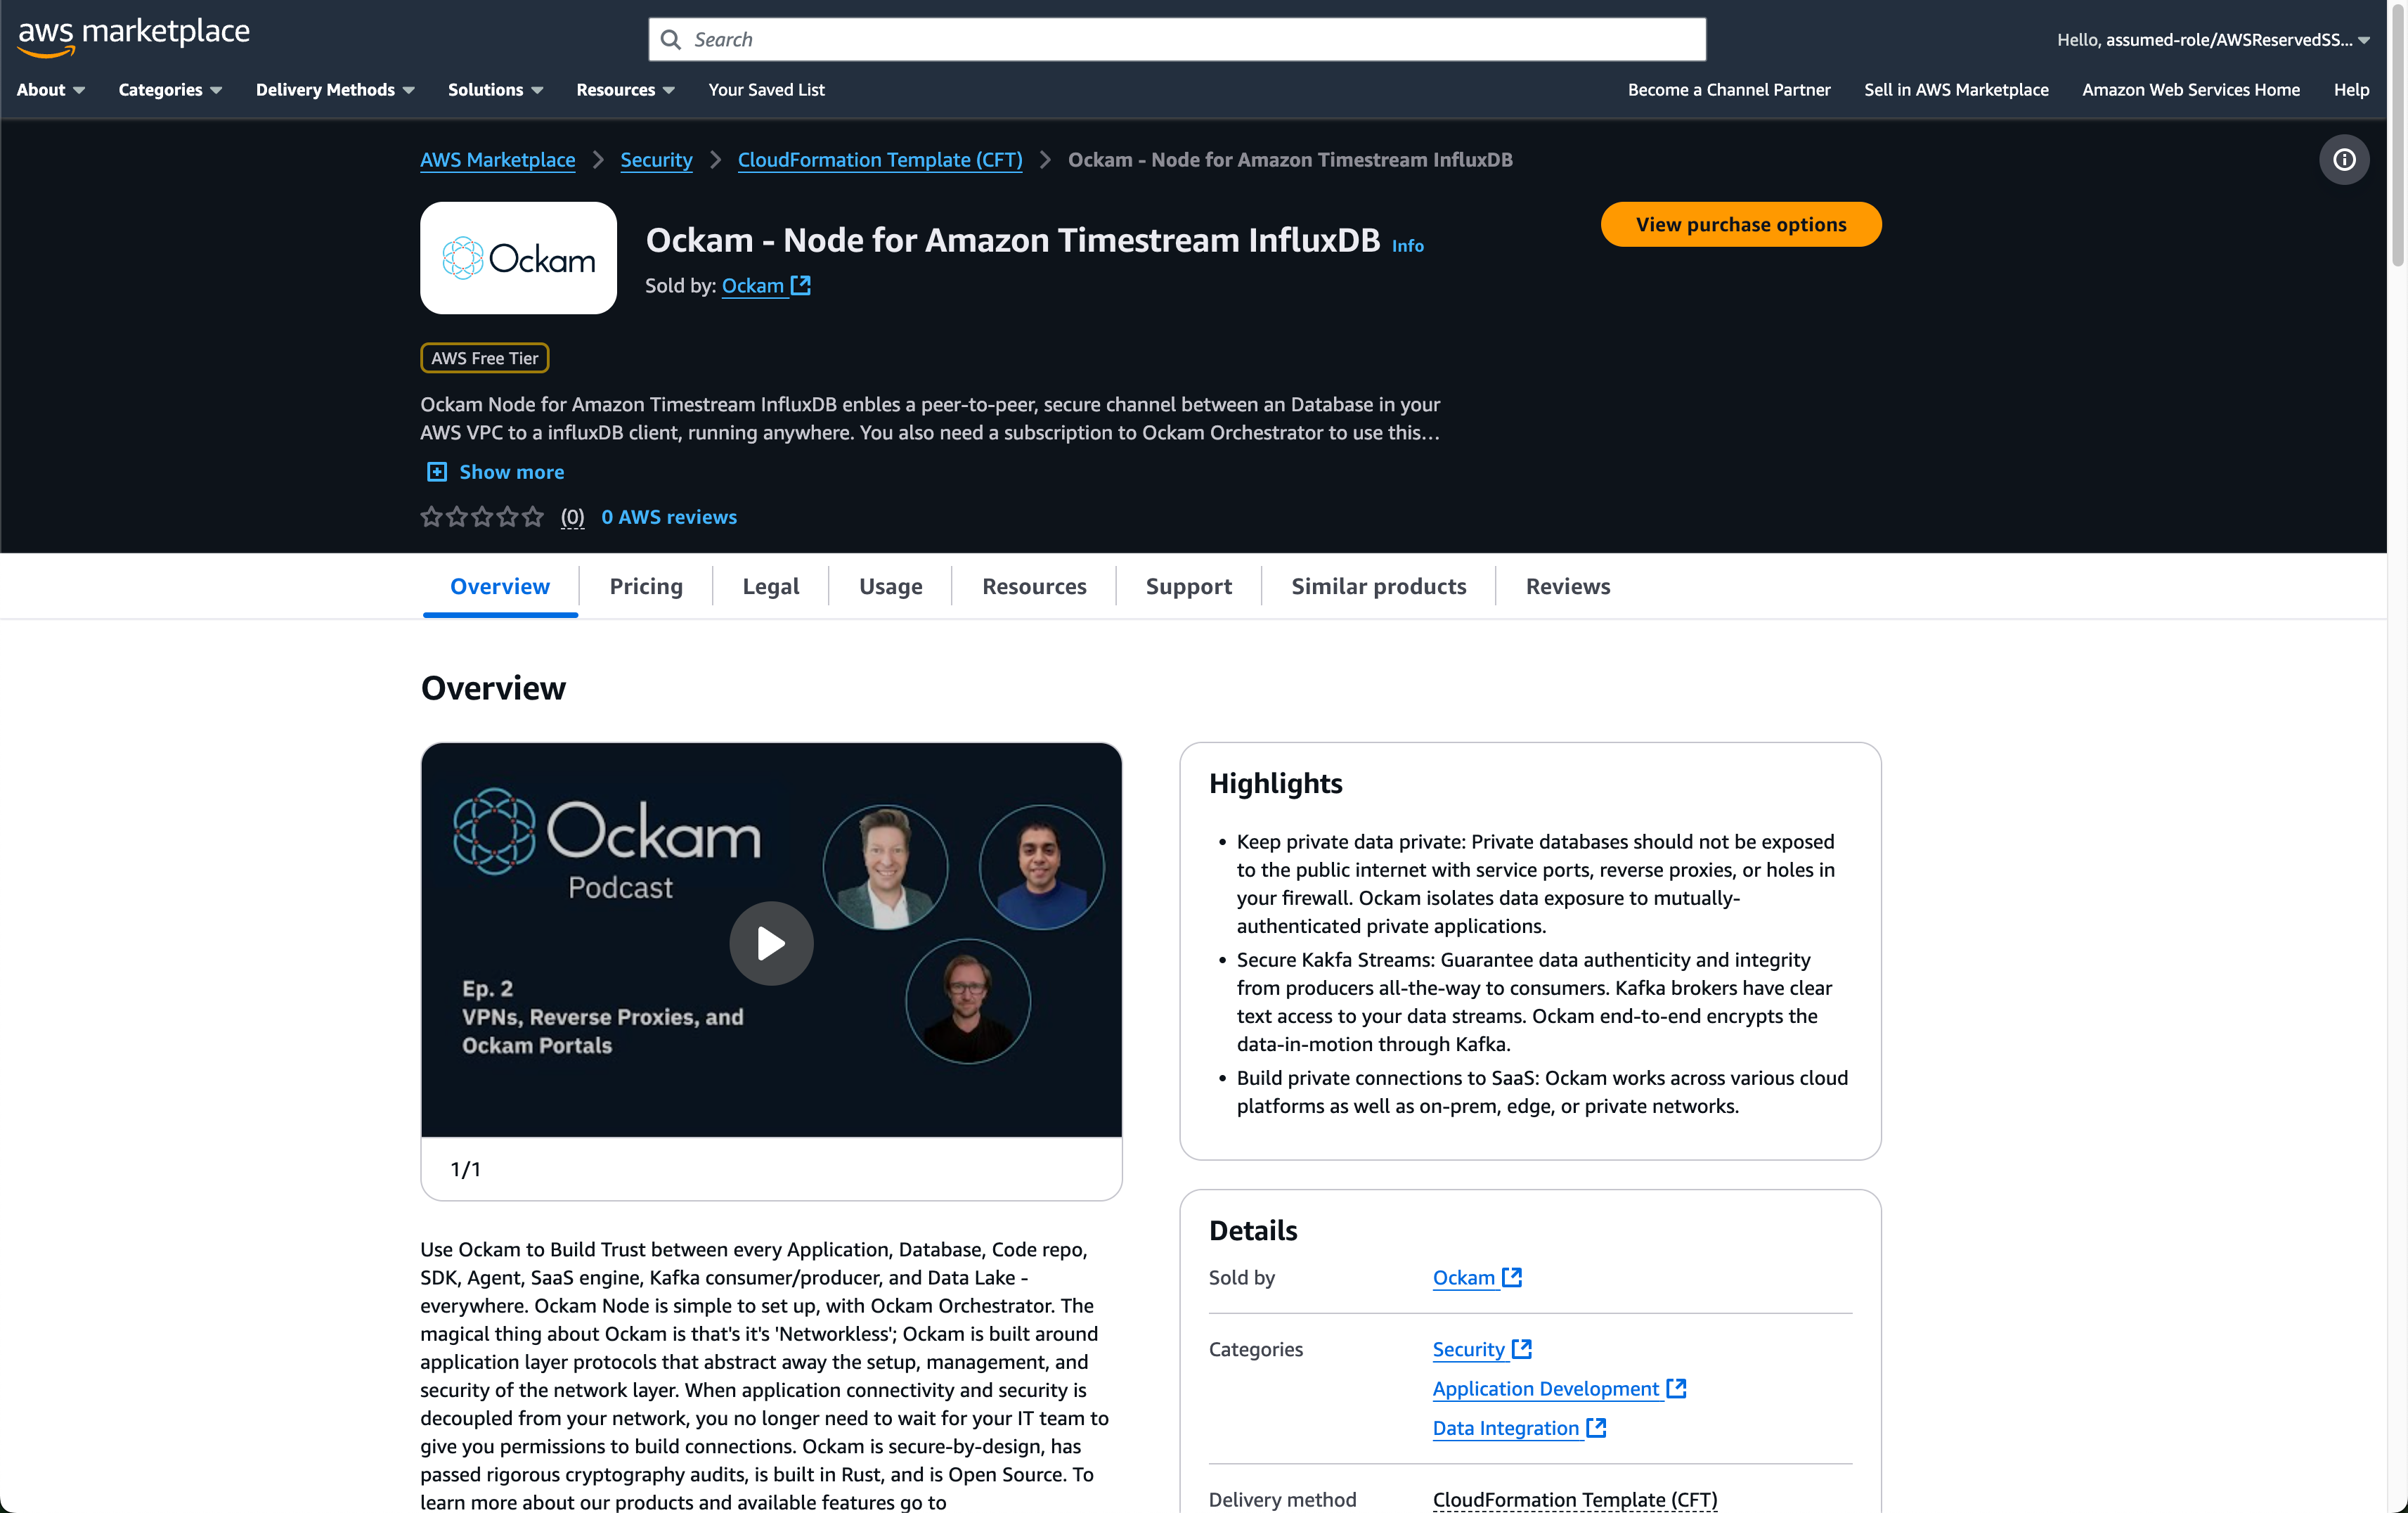
To deploy the node that will allow your InfluxDB client to reach your Amazon Timestream InfluxDB instance visit
the "Ockam - Node for Amazon Timestream InfluxDB", and click the Continue to Subscribe button, and then Continue to Configuration.
On the configuration page choose the region that your Amazon Timestream InfluxDB instance is running in, and then click Continue to Launch followed by Launch.
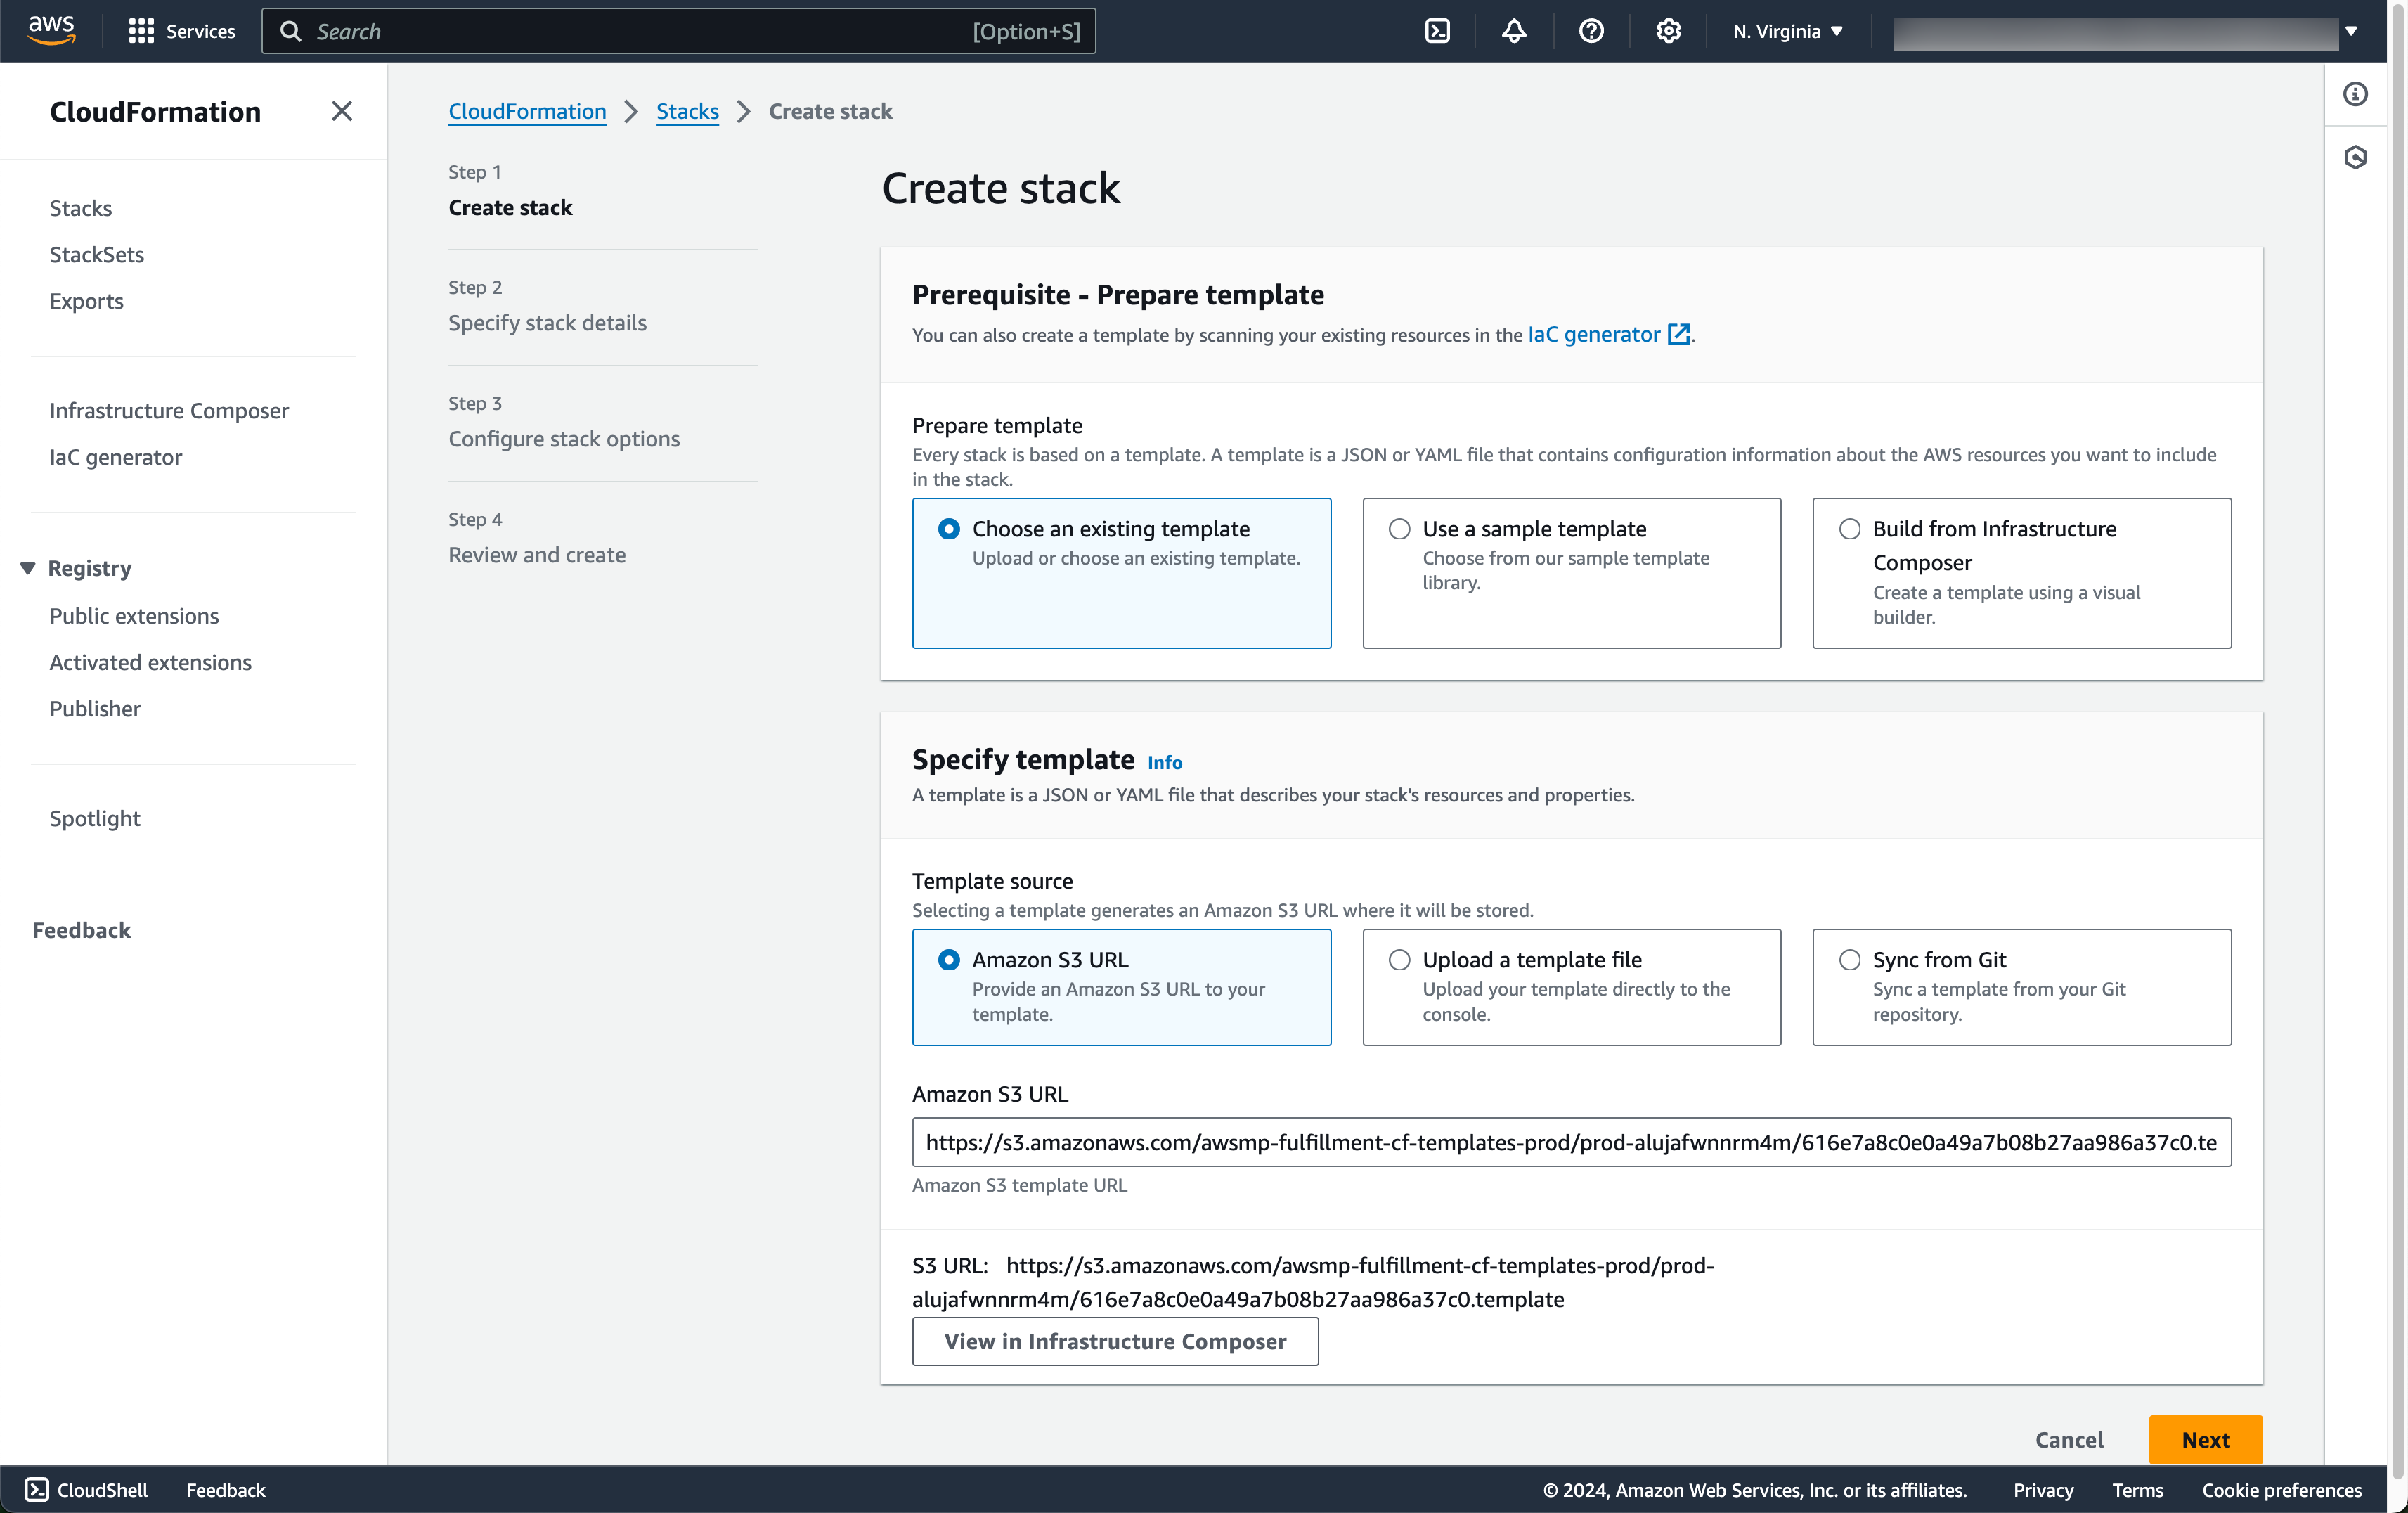
Enter stack details
The initial Create Stack screen pre-fills the fields with the correct
information for your node, so you can press Next to proceed.
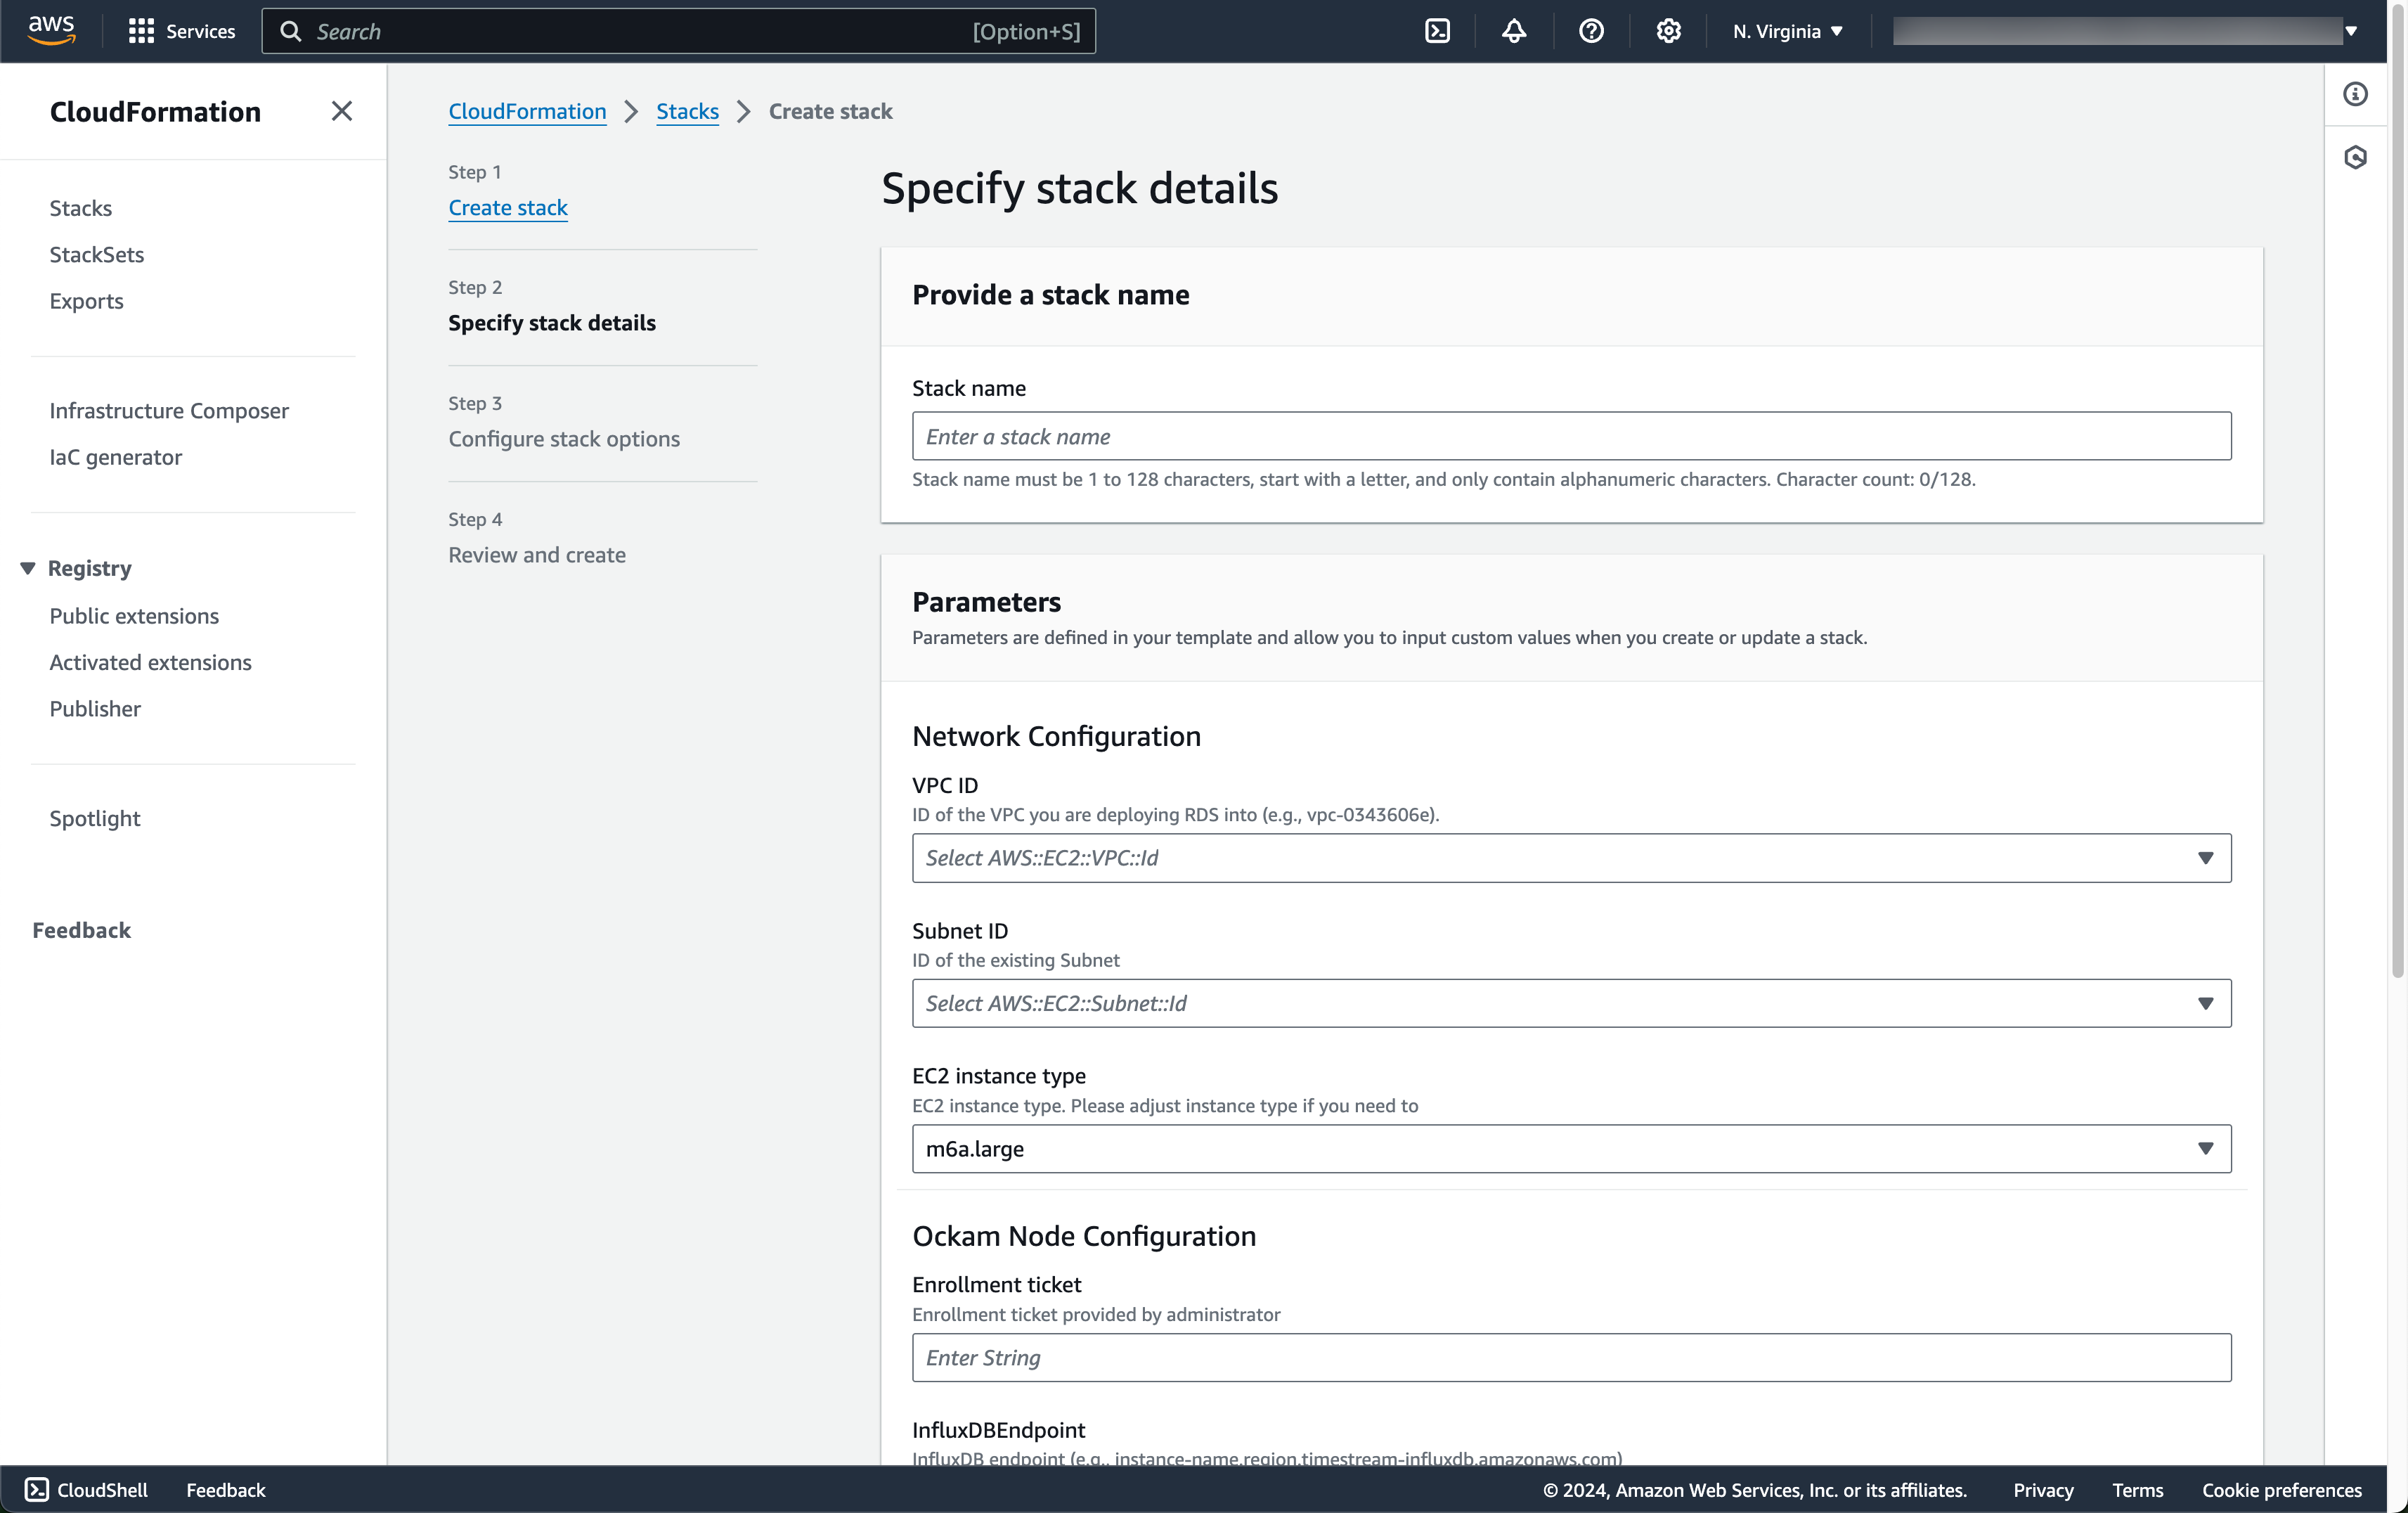
Enter node configuration
This screen has important details to you need to fill in:
- Stack name: Give this stack a recognizable name, you'll see this in various locations in the AWS Console. It'll also make it easier to clean these resources up later if you wish to remove them.
- VPC ID: The ID of the Virtual Private Cloud network to deploy the node in. Make sure it's the same VPC where you've deployed your InfluxDB instance.
- Subnet ID: Choose a suitable Subnet ID within the chosen VPC that has access to Amazon Timestream InfluxDB Database. Note that the subnet's IP address range must be added to the InfluxDB security group inbound rules.
- EC2 instance type: Choose a suitable EC2 instance type. Default instance type is
m6a.large. Adjust instance type depending on your use case. If you would like to have predictable network bandwidth of 12.5 Gbps usem6a.8xlarge. Make sure the instance type is available in the subnet you are launching in. - Enrollment ticket: Copy the contents of the
outlet.ticketfile we created earlier and paste it in here. - InfluxDB Endpoint: Copy the
Endpointvalue for the InfluxDB Database. - InfluxDB Org ID: Copy the
Organization IDvalue for the InfluxDB Database obtained earlier by runninginflux org listcommand. - InfluxDB Token Secret ARN: Copy the ARN of the secret we created earlier.
- InfluxDB Leased Token Permission: Copy and paste the below configuration. It is a JSON array of permission objects for InfluxDB leased token(s). When Ockam inlet node requests a leased token from outlet node, it will use the permissions specified here. Leave the variable
INFLUX_ORG_IDas it will be replaced during runtime. For this example we will use below permissions that allows read and write access to all buckets.
_16[_16 {_16 "action": "read",_16 "resource": {_16 "type": "buckets",_16 "orgID": "INFLUX_ORG_ID"_16 }_16 },_16 {_16 "action": "write",_16 "resource": {_16 "type": "buckets",_16 "orgID": "INFLUX_ORG_ID"_16 }_16 }_16]
- JSON Node Configuration: Copy and paste the below configuration. Note that the configuration values for
relayandallowmatch with the enrollment tickets created in the previous step.INFLUX_ENDPOINT,INFLUX_ORG_ID,INFLUX_TOKENandLEASED_TOKEN_PERMISSIONSwill be replaced with the values provided in the cloudformation stack details.
_19{_19 "http-server-port": 23345,_19 "relay": "influxdb",_19 "tcp-outlet": {_19 "to": "INFLUX_ENDPOINT:8086",_19 "from": "ui-outlet",_19 "allow": "amazon-influxdb-inlet",_19 "tls": true_19 },_19 "influxdb-outlet": {_19 "to": "INFLUX_ENDPOINT:8086",_19 "tls": true,_19 "allow": "amazon-influxdb-inlet",_19 "org-id": "INFLUX_ORG_ID",_19 "all-access-token": "INFLUX_TOKEN",_19 "leased-token-expires-in": "300",_19 "leased-token-permissions": "LEASED_TOKEN_PERMISSIONS"_19 }_19}
Ockam Command will process the configuration file after the node starts, with the
first instruction being to create a relay with the name influxdb. This relay will
allow InfluxDB client to establish a secure end-to-end encrypted connection to your
InfluxDB Database. It provides the ability to have entirely isolated infrastructure
running within a private network, without requiring you to expose any endpoints
to the public Internet and no configuring of allow lists to custom network routes.
An outlet decrypts any messages received by the node and then forwards them to the specified InfluxDB address.
Click Next to launch the CloudFormation run.
A successful CloudFormation stack run configures the Ockam Timestream InfluxDB Outlet node on an EC2 machine.
- EC2 machine mounts an EFS volume created in the same subnet. Ockam state is stored in the EFS volume.
- A security group with egress access to the internet will be attached to the EC2 machine.
- Connect to the EC2 machine via AWS Session Manager.
- To view the log file, run
sudo cat /var/log/cloud-init-output.log. - Successful run will show
Ockam node setup completed successfullyin the logs
- To view the log file, run
- View the Ockam node status in CloudWatch.
- Navigate to Cloudwatch -> Log Group and select
<STACK_NAME>-status-logs. Select the Logstream for the EC2 instance. - The Cloudformation template creates a subscription filter that sends data to a Cloudwatch alarm
<STACK_NAME>-OckamNodeDownAlarm.Alarm will turn green upon ockam node successfully running.
- Navigate to Cloudwatch -> Log Group and select
- An Autoscaling group ensures at least one EC2 instance is running at all times
Step 4: Deploy the Ockam Inlet Node
You can set up an Ockam InfluxDB Inlet Node locally using Docker or command line.
Setup an Ockam Inlet Node along with telegraf client in Docker
To set up an Inlet Node locally and interact with it outside of AWS, use Docker Compose.
Seeing the results
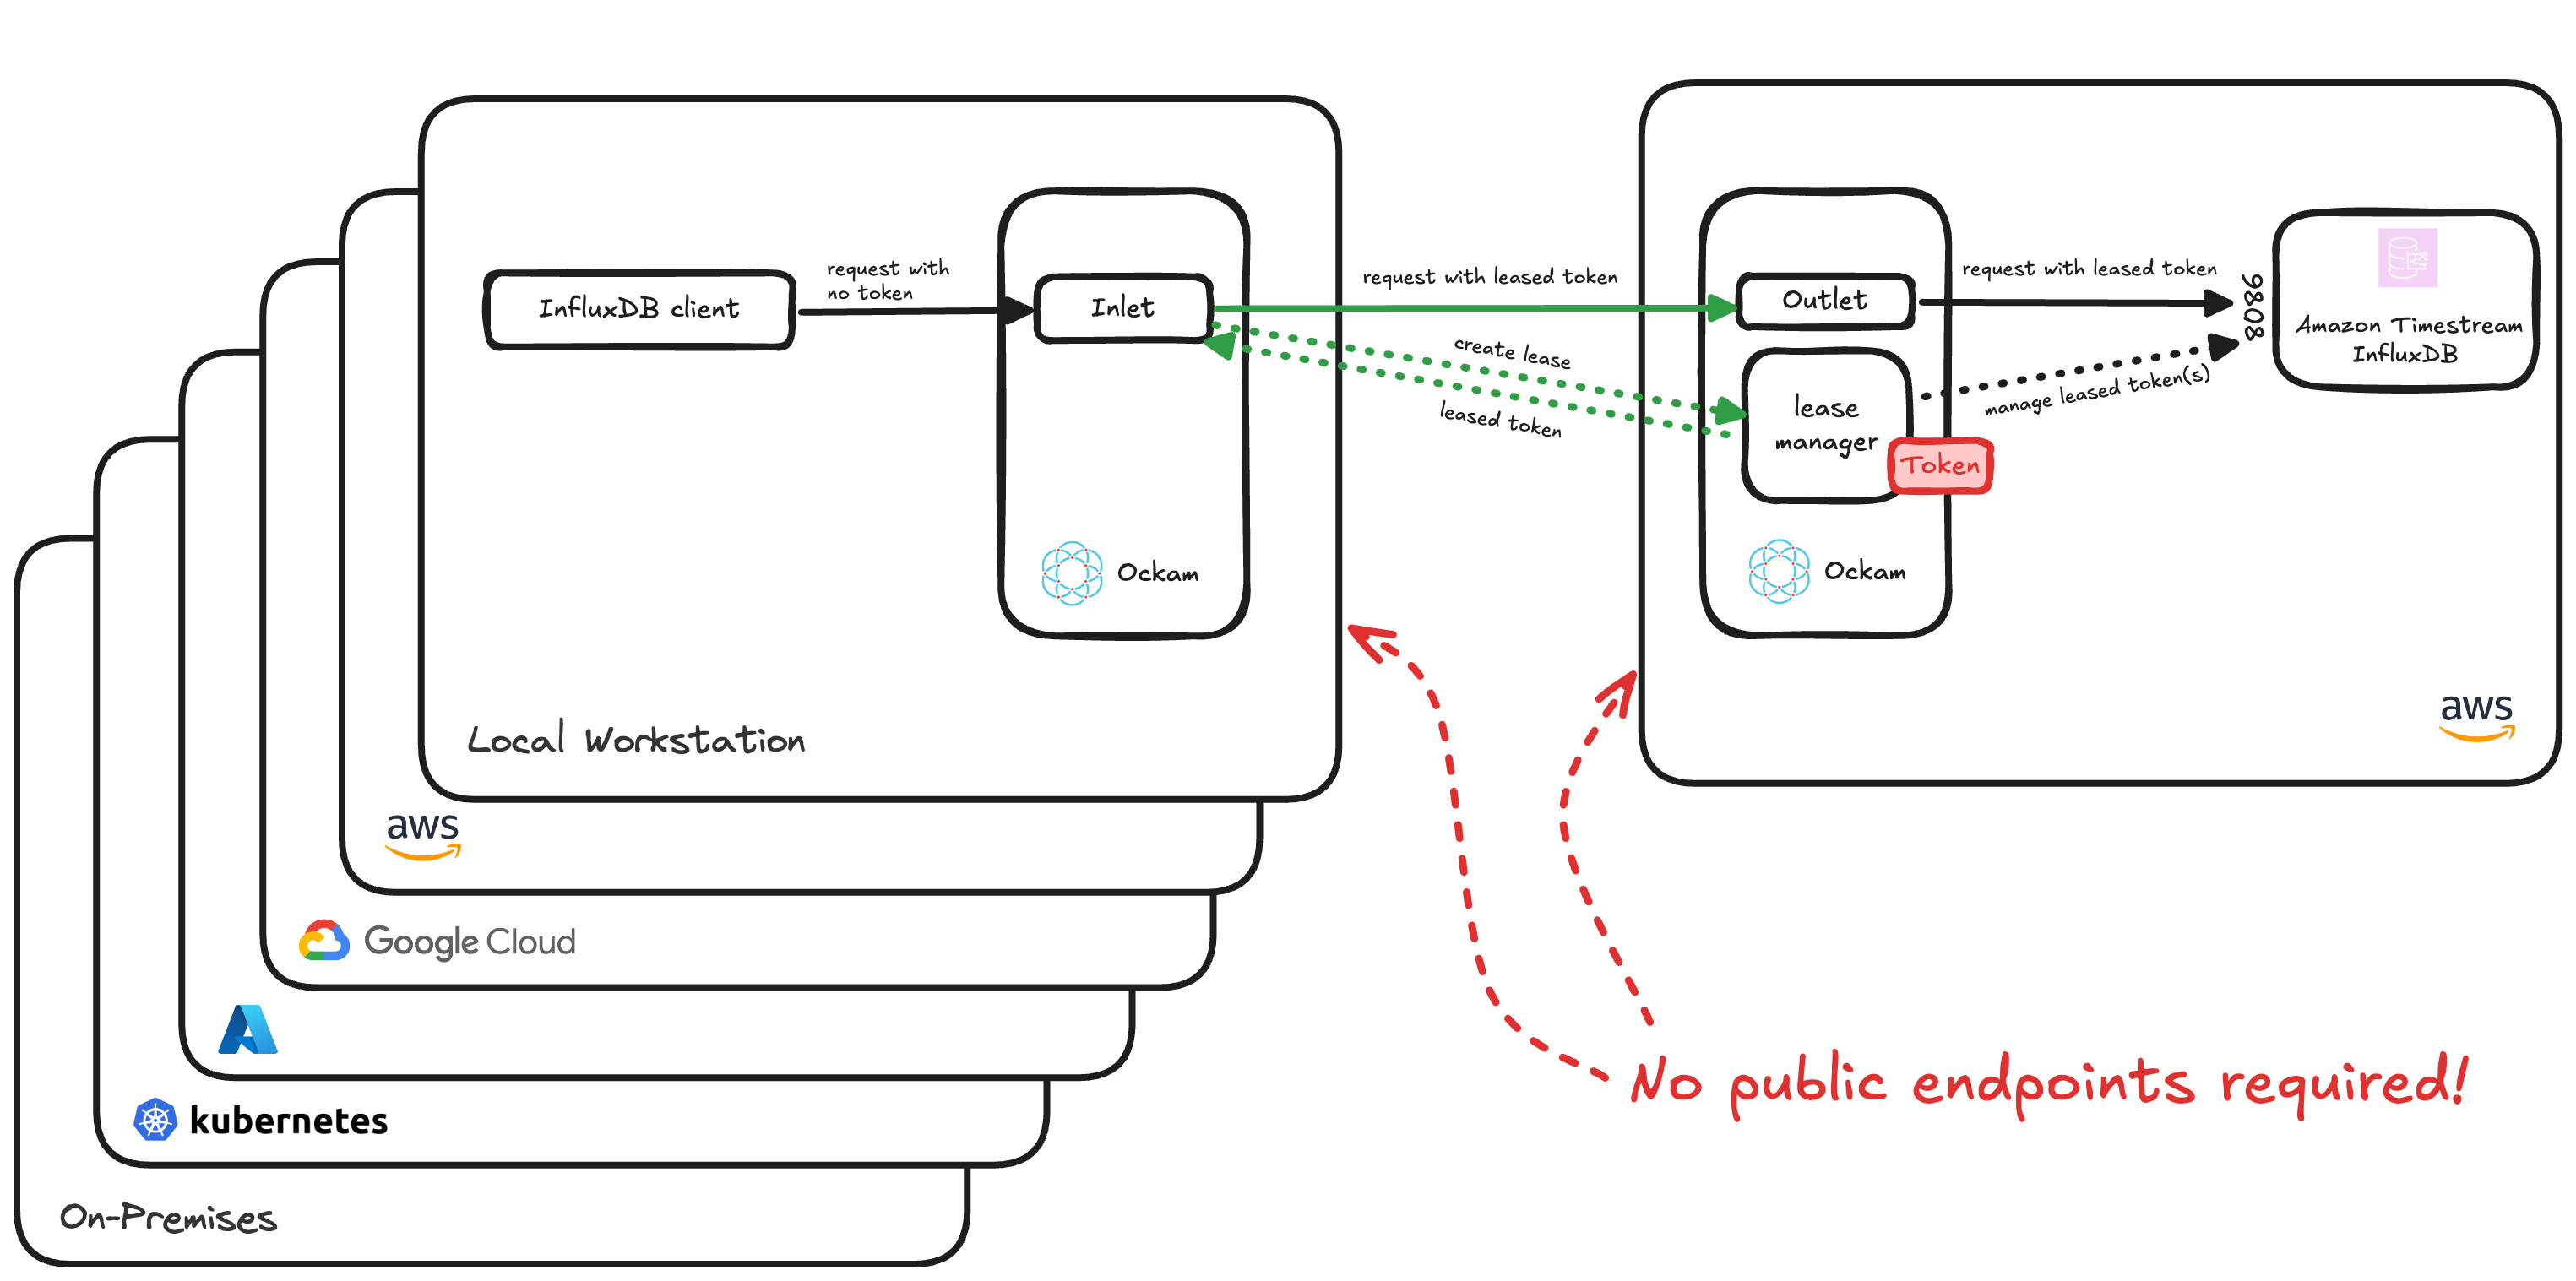
You have now successfully setup end-to-end encrypted connection between your InfluxDB instance running in AWS and your local machine running the telegraf client. Final setup looks like this:
Querying with Influx CLI
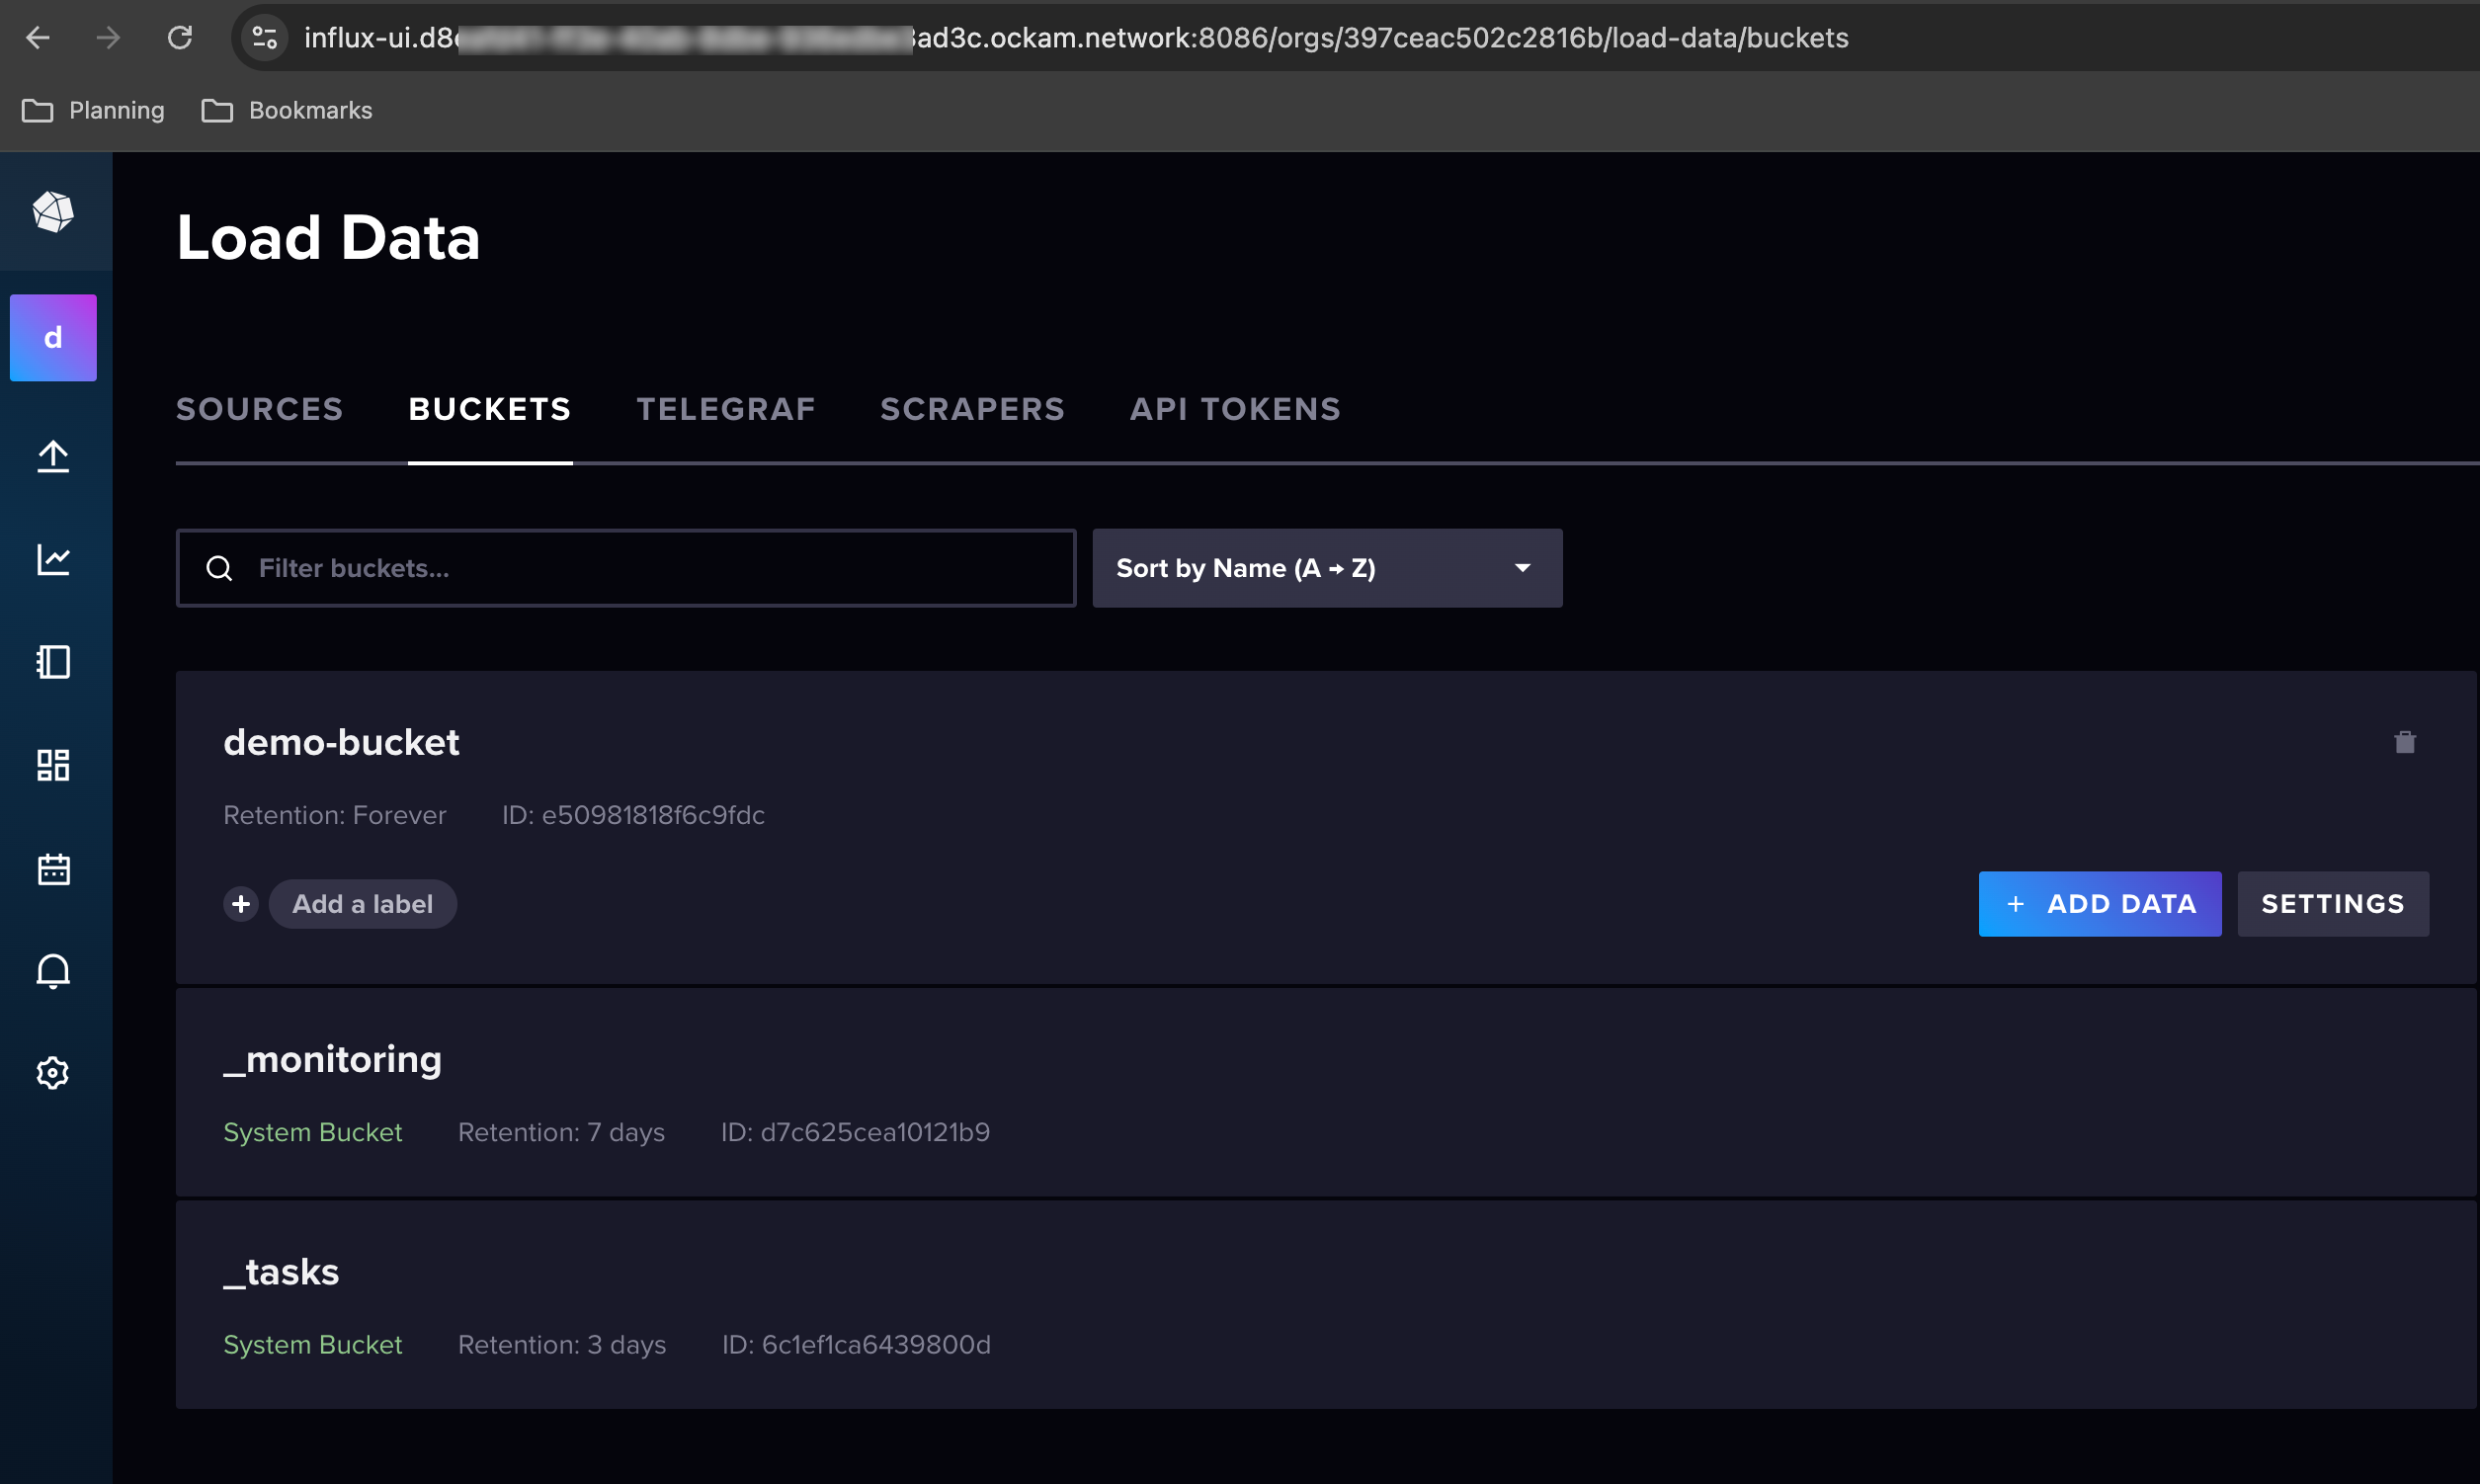
Accessing the Admin Dashboard
You can access the InfluxDB UI at https://influxdb-inlet.YOUR_PROJECT_ID.ockam.network:8086
Adding more clients
You can issue additional inlet enrollment tickets to any number of machines and they'll all be able to securely connect to your InfluxDB instance. Each inlet node will request a leased token from the outlet node and use it to authenticate with the InfluxDB instance. The outlet node will rotate the leased token based on the expiry time set in the configuration to ensure the security of the connection.
What did we just achieve?
Let's quickly recap everything we've just implemented, because it can happen so quickly it can be easy to miss:
- We're able to establish private & secure point-to-point connections to our Amazon Timestream for InfluxDB instance from any number of clients, from any network.
- Each client has a unique identity, and can additionally have cryptographically attestable attributes applied to it by an administrator. Those attributes can then be used to define Attribute Based Access Control policies that control which nodes can establish a connection to our private InfluxDB server.
- Each connection is mutually authenticated and end-to-end encrypted.
- The nodes generate and share encryption keys themselves to establish a secure connection — so there's no centralised handling or storage of keys by third-party.
- The Ockam protocol also automatically and regularly rotates the encryption keys.
- Combined with the lease manager, each uniquely identifiable InfluxDB client will now receive its own unique time-limited InfluxDB access token. The token will be securely distributed to clients over mutually authenticated Ockam secure channel.
- There's was no need to make our InfluxDB service accessible from the public internet.
- There's no more sharing of long-lived InfluxDB access tokens across multiple clients.
- There's no more risk and complications associated distributing sensitive access tokens to clients.
- … and we can access the InfluxDB Admin Dashboard!
Ockam is able to set all of this up in minutes, and replaces the riskiest parts of connecting private systems with an approach that is almost impossible to get wrong. And while this guide emphasises setting this up with Amazon Timestream, the approach works exactly the same with any self-hosted InfluxDB server. You'll need to start the outlet node manually using Ockam Command, though I'm happy to help explain how to do get that running. If you need some help drop me a note.
Troubleshooting
Common issues and solutions:
- Connection Issues:
- Ensure the InfluxDB endpoint and port (8086) are correct.
- Verify that the InfluxDB instance is reachable from the Ockam outlet node.
- Check security group settings on both the InfluxDB instance and the Ockam outlet node.
- Ockam Node Issues:
- Verify token attributes match the configuration.
- Ensure the enrollment ticket is correct and valid.
- InfluxDB Issues:
- Verify the InfluxDB token has the necessary permissions.
- Check organization name and bucket name in the telegraf client configuration.
- Review lease manager configuration
If you continue to experience issues, please reach out to us for further assistance.
Next Article
Run Queries on Remote PostgreSQL from Snowflake
